Introduction to the Linux Shell#
1. The Shell#
Traditional computers: Graphical User Interface (GUI)
include modern Linux distros
Remote Linux cluster of computers: Command-Line Interface (CLI)
Great for automation
Familiarity with CLI and shell scripting is essential
Linux CLI: The Shell
Is a program where users can type commands
Tasks that are often managed by a mouse click are now carried out by these commands and their respective options (flags)
Shell scripting:
Sequence of commands can be combined into a
scriptto automate the workflow.
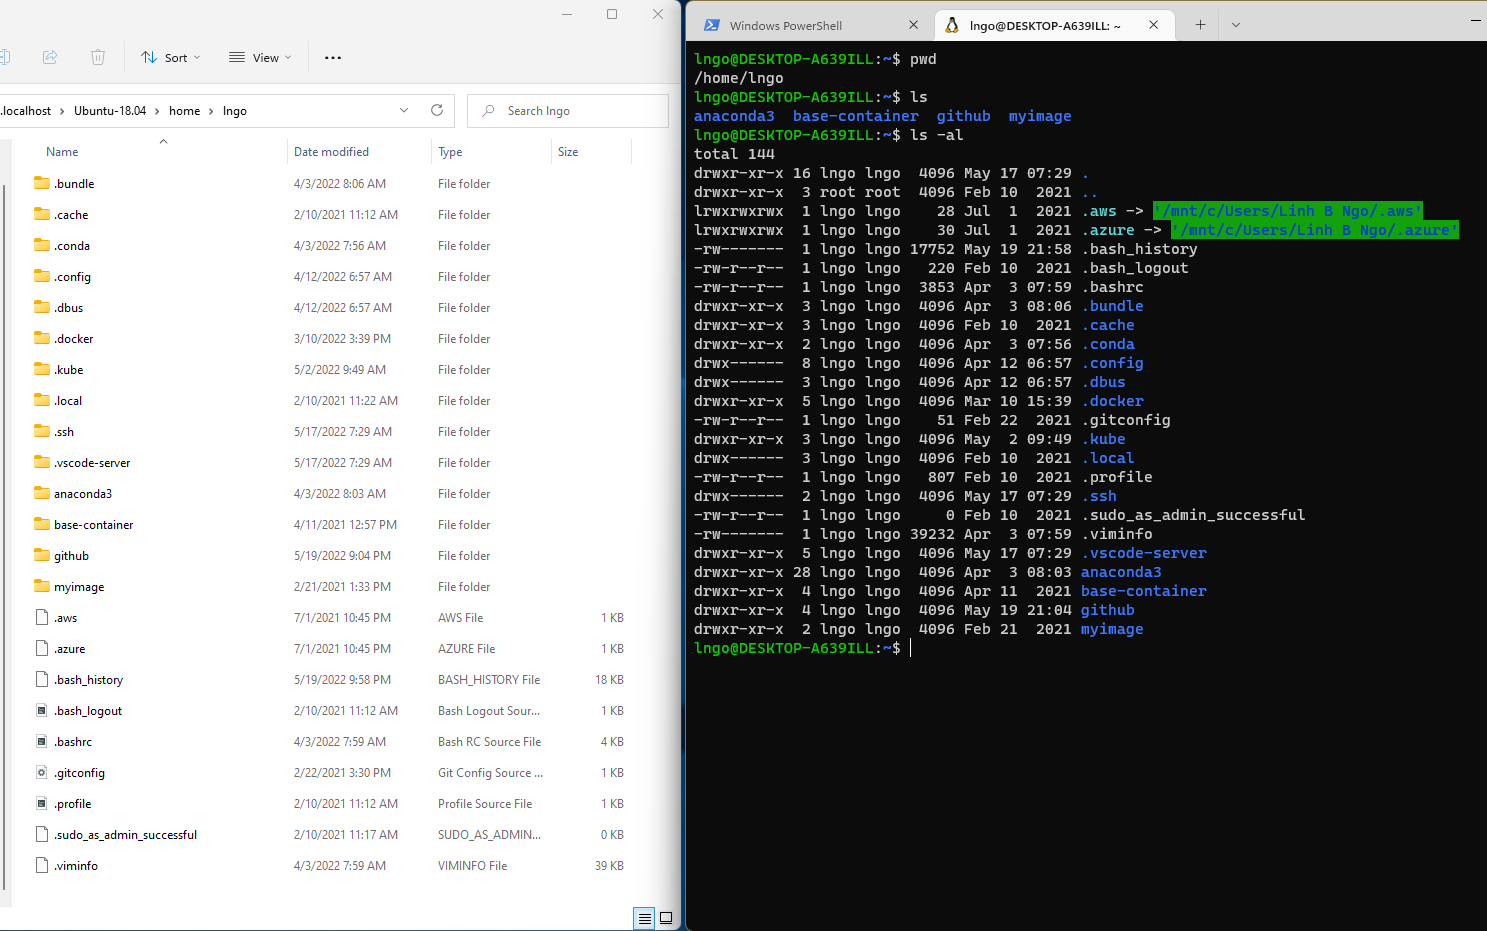
This is an example comparing the contents of a directory between a GUI view (left) and a CLI view (right).
Both display contents of a home directory on a Windows Kernel Subsystem for Linux (Ubuntu distro)
2. Hands-on: preparing shell and data#
SSH to
molly.Run the following commands to prepare the environment.
$ wget --no-check-certificate https://www.cs.wcupa.edu/lngo/data/shell-lesson-data.zip
$ unzip shell-lesson-data.zip
3. Files and Directories#
File System: an Operating System component responsible for managing files and directories.
Perspective:
On a GUI, you click to move from one place to another, so you are outside the file system space looking in.
On a CLI, you need to explicitly provide direction (path) for the command to know with which file/directory it is supposed to interact. The perspective is more inside the file system space.
Key commands:
pwd: path of working (current) directoryls: listingcd: change directory
Key definition:
4. Hands-on: pwd, ls, cd#
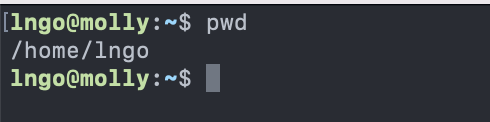
pwdreturns the absolute path to the current working directory (i.e.: where you are when you are in the terminal).
$ pwd
lsreturns the list of current files and directories in the target directory.
$ ls /

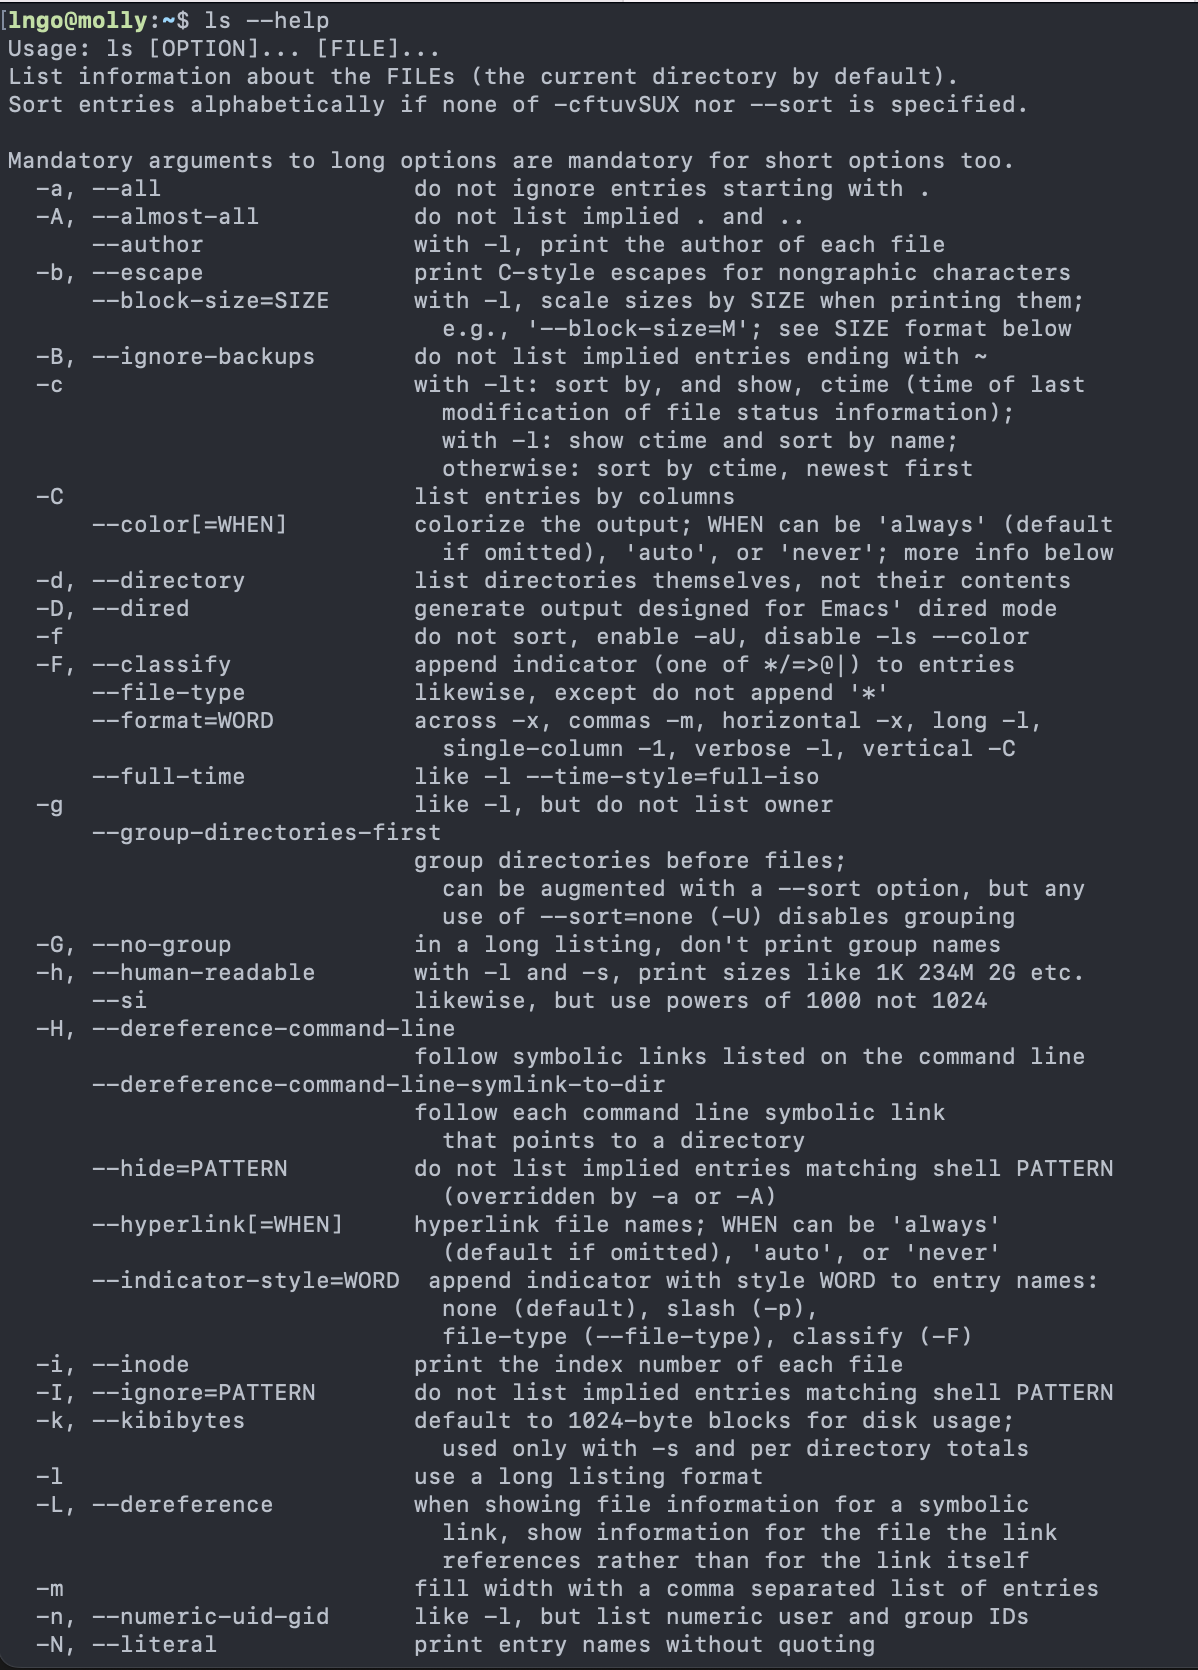
There are many options available for different commands. To view the documentation, run the followings:
As a sys admin, you have to become very good at reading documentation!
$ ls --help
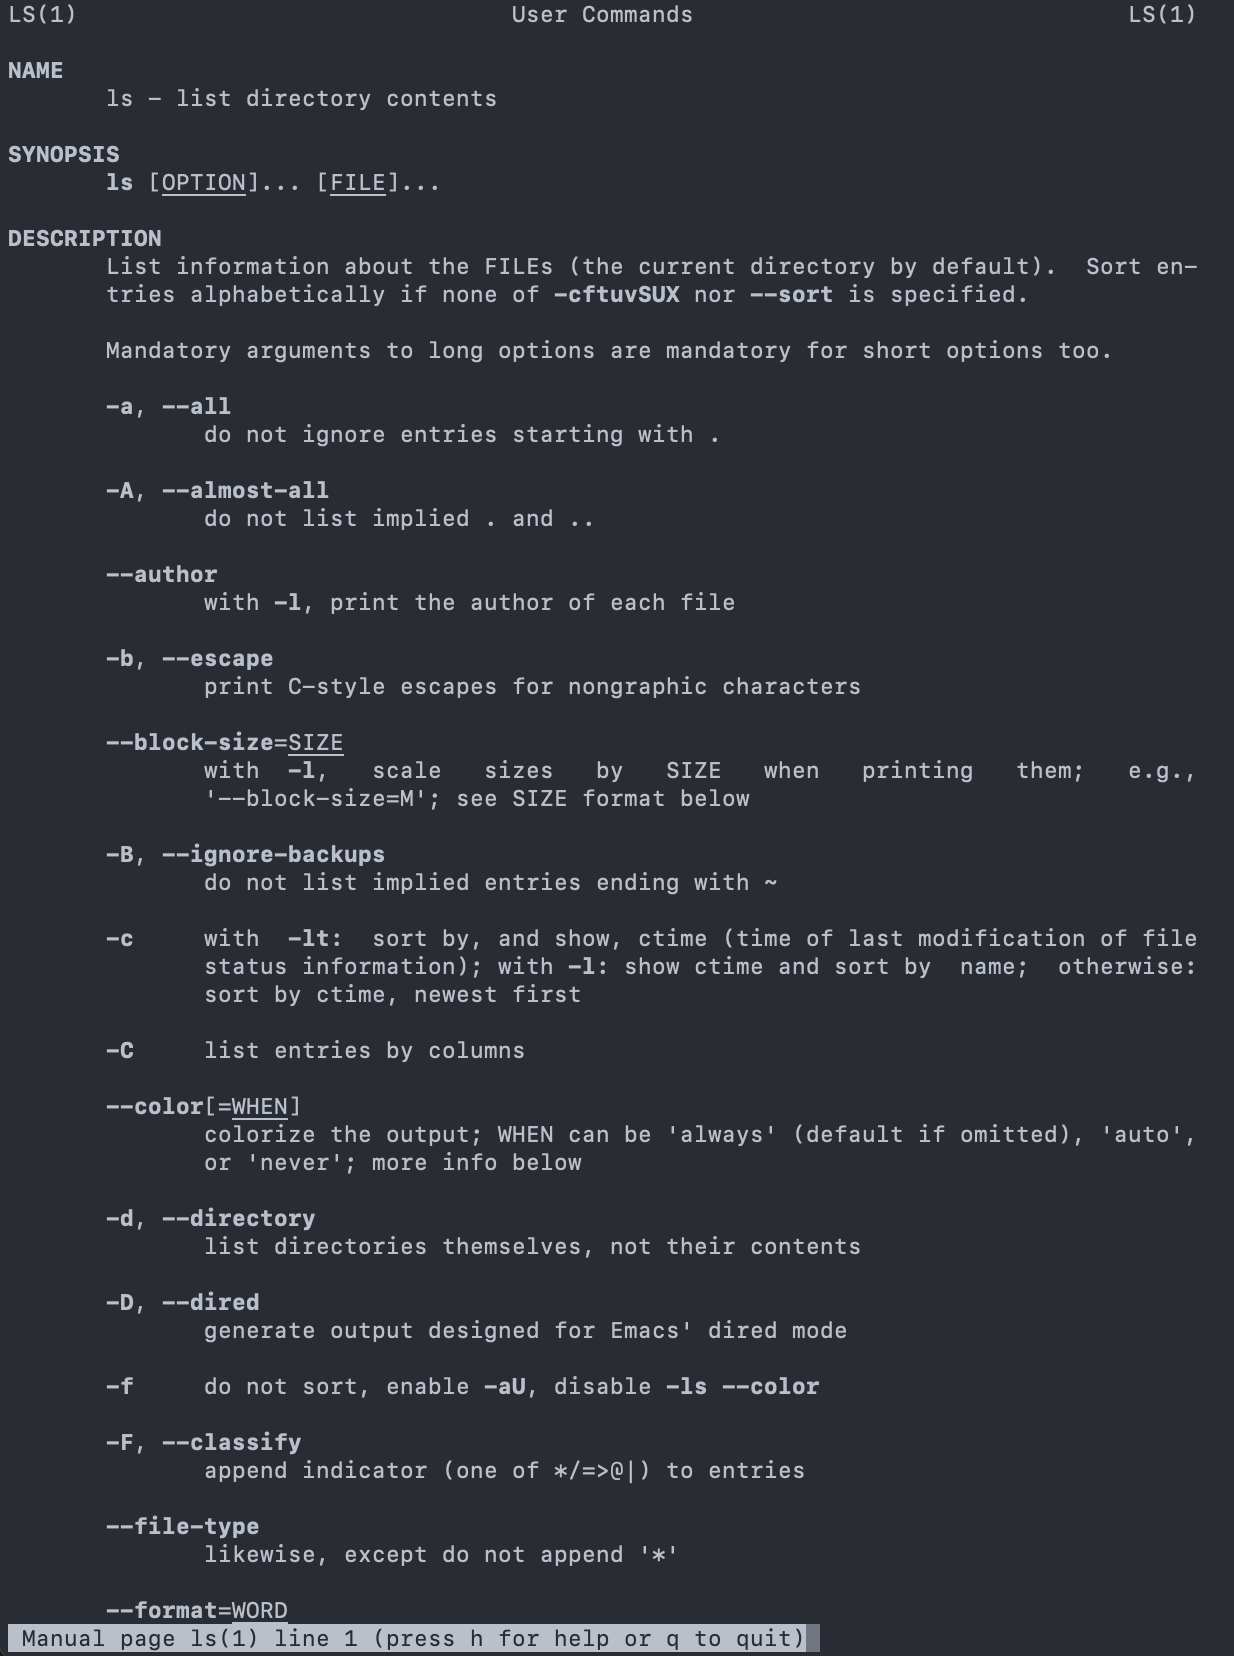
Detailed manual can be viewed using the following command:
Use the
Spacekey to move down page by pageHow do you quit?
$ man ls
Challenge: exploring more ls flags
You can also use two options at the same time. What does the command
lsdo when used with the-loption? What about if you use both the-land the-hoption?Some of its output is about properties that we do not cover in this lesson (such as file permissions and ownership), but the rest should be useful nevertheless.
Solution
The
-loption makeslsuse a long listing format, showing not only the file/directory names but also additional information, such as the file size and the time of its last modification.If you use both the
-hoption and the-loption, this makes the file size human readable, i.e. displaying something like 5.3K instead of 5369.
Challenge: Listing in reverse chronological order
By default, ls lists the contents of a directory in alphabetical order by name. The command ls
-tlists items by time of last change instead of alphabetically. The command ls-rlists the contents of a directory in reverse order.Which file is displayed last when you combine the
-tand-roptions? Hint: You may need to use the -l option to see the last changed dates.
Solution
The most recently changed file is listed last when using -rt.
This can be very useful for finding your most recent edits or
checking to see if a new output file was written.
Run
lsby itself will list the contents of the current directory.
$ ls
cdallows users to change the current directory (outcome ofpwd) to the target directory.Run
man cdorcd --helpto read the documentation forcd.The generate syntax for
cdiscd DESTINATIONwithDESTINATIONcan either be absolute or relative paths or special paths.
Change to root directory and view contents of root:
$ cd /
$ ls
Special paths:
~: home direcrory.: current directory..: a directory that is one level above the current directory
Change to your home directory using either the special paths or
/home/YOURUSERNAME(YOURUSERNAME: your username onmolly)Check the content of your home directory to confirm that you have the
shell-lesson-datadirectory.Change into
shell-lesson-datadirectory and view the contents of this directory
$ cd ~
$ ls
$ cd shell-lesson-data
$ ls

Challenge: ls Reading comprehension
Using the filesystem diagram below.
If
pwddisplays/Users/backupand-rtellslsto display things in reverse order, what command(s) will result in the following output:
pnas_sub/ pnas_final/ original/

ls pwdls -r -Fls -r -F /Users/backup
Solution
No:
pwdis not the name of a directory.Yes:
lswithout directory argument lists files and directories in the current directory.Yes: uses the absolute path explicitly.
5. General syntax of a shell command#

lsis the command, with an option-Fand an argument/.Option:
either start with a single dash (
-) or two dashes (--),change the behavior of a command.
can be referred to as either
switchesorflags.
Arguments tell the command what to operate on (e.g. files and directories).
Sometimes
optionsandargumentsare referred to as parameters.The shell is in fact just a process/function and these
optionsandargumentsare being passed as parameters to the shell’s function that is responsible for executing the command.
A command can be called with more than one option and more than one argument, but a command doesn’t always require an argument or an option.
Each part is separated by spaces: if you omit the space between
lsand-Fthe shell will look for a command calledls-F, which doesn’t exist.Capitalization can be important.
ls -swill display the size of files and directories alongside the namesls -Swill sort the files and directories by size
6. Hands-on: explore data#
Check where you are, change back to your home directory, then navigate to
exercise-data.
$ pwd
$ cd ~
$ cd shell-lesson-data
$ cd exercise-data/writing
$ ls -F
7. Creating directories: mkdir#
Create a directory called
thesis, and check for its existence.Also check that there is nothing inside the newly created directory.
$ mkdir thesis
$ ls -F
Challenge: mkdir creating multiple directories
What is the role of the
-pflag in the following commands:
$ mkdir ../project/data
$ ls -F ../project
$ mkdir -p ../project/data
$ mkdir -p ../project/report ../project/results
$ ls -F ../project
Solution
-p allows the creation of all directories
on the specified path, regardless whether any directory on
that path exists.
Important for directory and file names in Linux!!!
Do not use spaces/special characters in file and directory names.
Use
-,_, and.for annotation, but do not begin the names with them.
8. Creating files: nano (or vim)#
Linux terminal environment is text-only, hence its editors are text only as well.
nanovimemacs.
Fun read: One does not simply exist vim
We are using nano (lowest learning curve).
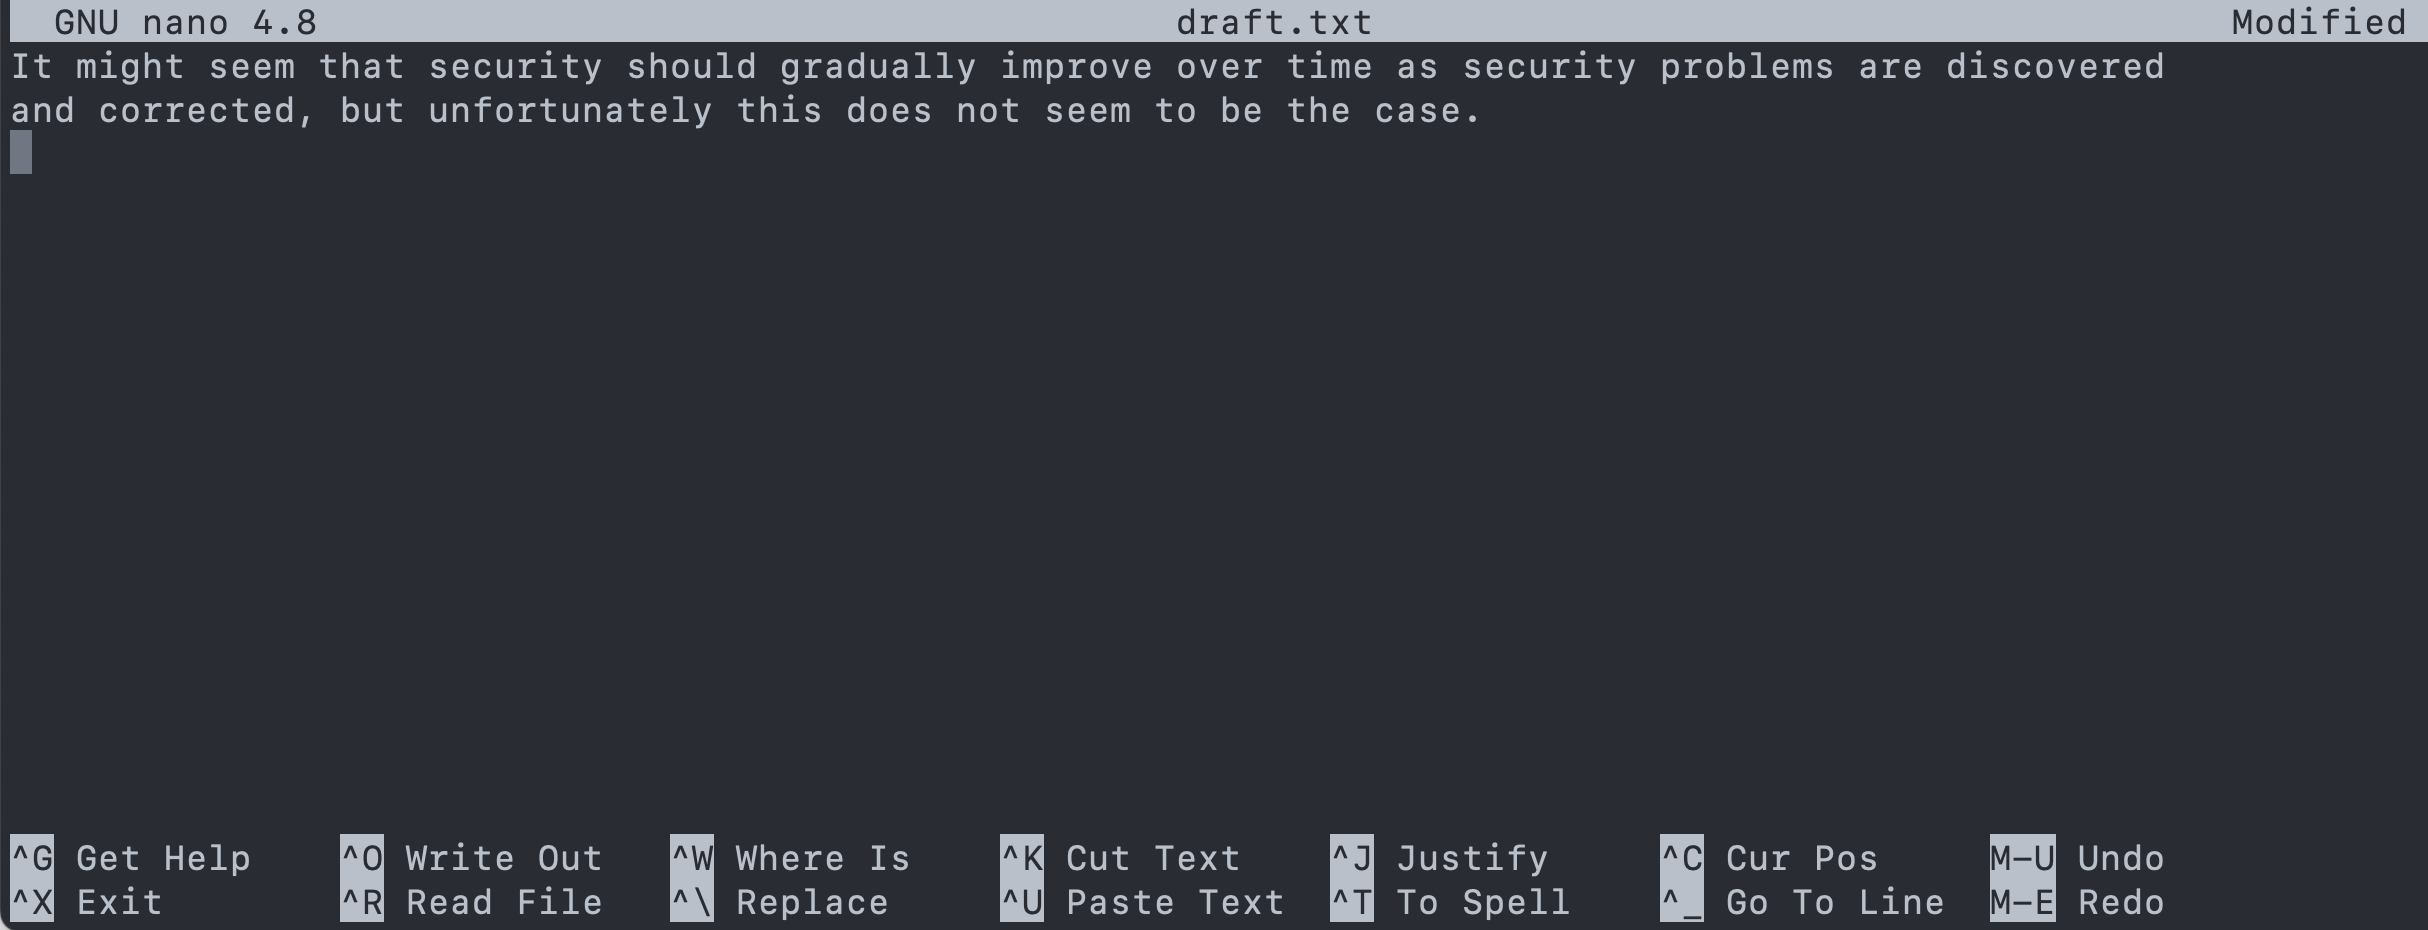
Create a file named
draft.txtinsidethesis.Type in the contents shown in the screenshot.
$ pwd
$ ls
$ cd thesis
$ nano draft.txt
To save the text, you need to press
Ctrl+Okeys:Press and hold
Ctrlthen pressO.You will be asked whether to keep the same file name or to edit the name. Press
Enterto confirm.
To quit nano, press
Ctrl+X.If you have not saved the text before, nano will ask if you want to save the file first and confirm the name with
YorN.
9. Moving files and directories: mv#
mvis short for move. It will move a file/directory from one location to another.
$ cd ~/shell-lesson-data/exercise-data/writing
$ ls thesis
$ mv thesis/draft.txt thesis/quotes.txt
$ ls thesis
$ mv thesis/quotes.txt .
$ ls thesis
$ ls
Challenge: Moving files to a new folder
After running the following commands, Jamie realizes that she put the files
sucrose.datandmaltose.datinto the wrong folder. The files should have been placed in therawfolder.
$ ls -F
analyzed/ raw/
$ ls -F analyzed
fructose.dat glucose.dat maltose.dat sucrose.dat
$ cd analyzed
Fill in the blanks to move these files to the
rawfolder:
$ mv sucrose.data maltose.data ____/_____
Solution
$ mv sucrose.data maltose.data ../raw
10. Copying files and directories: cp#
cpstands for copy. It copies a file or directory to a new location, possibly with a new name.
$ cp quotes.txt thesis/quotations.txt
$ ls quotes.txt thesis/quotations.txt
$ cp -r thesis thesis_backup
$ ls thesis thesis_backup
Challenge: Renaming files
Suppose that you created a plain-text file in your current directory to contain a list of the statistical tests you will need to do to analyze your data, and named it:
statstics.txtAfter creating and saving this file you realize you misspelled the filename! You want to correct the mistake, which of the following commands could you use to do so?
cp statstics.txt statistics.txt
mv statstics.txt statistics.txt
mv statstics.txt .
cp statstics.txt .
Solution
No. While this would create a file with the correct name, the incorrectly named file still exists in the directory and would need to be deleted.
Yes, this would work to rename the file.
No, the period(.) indicates where to move the file, but does not provide a new file name; identical file names cannot be created.
No, the period(.) indicates where to copy the file, but does not provide a new file name; identical file names cannot be created.
Challenge: Moving and copying
What is the output of the last
lscommand in the sequence shown below?
$ pwd
/home/rammy/data
$ ls
proteins.dat
$ mkdir recombined
$ mv proteins.dat recombined/
$ cp recombined/proteins.dat ../proteins-saved.dat
$ ls
proteins-saved.dat recombined
recombined
proteins.dat recombined
proteins-saved.dat
Solution
No,
proteins-saved.datis located at/home/rammy/Yes
proteins.datis located at/home/rammy/data/recombinedNo,
proteins-saved.datis located at/home/rammy/
11. Removing files and directories: rm#
Returning to the
shell-lesson-data/exercise-data/writingdirectory, let’s tidy up this directory by removing the quotes.txt file we created.The command we’ll use for this is
rm(short for ‘remove’):
$ cd ~/shell-lesson-data/exercise-data/writing
$ ls
$ rm quotes.txt
$ ls quotes.txt
$ rm thesis
$ rm -r thesis
12. Wildcards#
*is a wildcard, which matches zero or more characters.Inside
shell-lesson-data/exercise-data/proteinsdirectory:*.pdbmatchesethane.pdb,propane.pdb, and every file that ends with ‘.pdb’.p*.pdbonly matchespentane.pdbandpropane.pdb, because the ‘p’ at the front only matches filenames that begin with the letter ‘p’.
?is also a wildcard, but it matches exactly one character. So?ethane.pdbwould matchmethane.pdb*ethane.pdbmatches bothethane.pdb, andmethane.pdb.
Wildcards can be used in combination with each other
???ane.pdbmatches three characters followed byane.pdb.cubane.pdb,ethane.pdb,octane.pdb.
When the shell sees a wildcard, it expands the wildcard to create a list of matching filenames before running the command that was asked for. It is the shell, not the other programs, that deals with expanding wildcards.
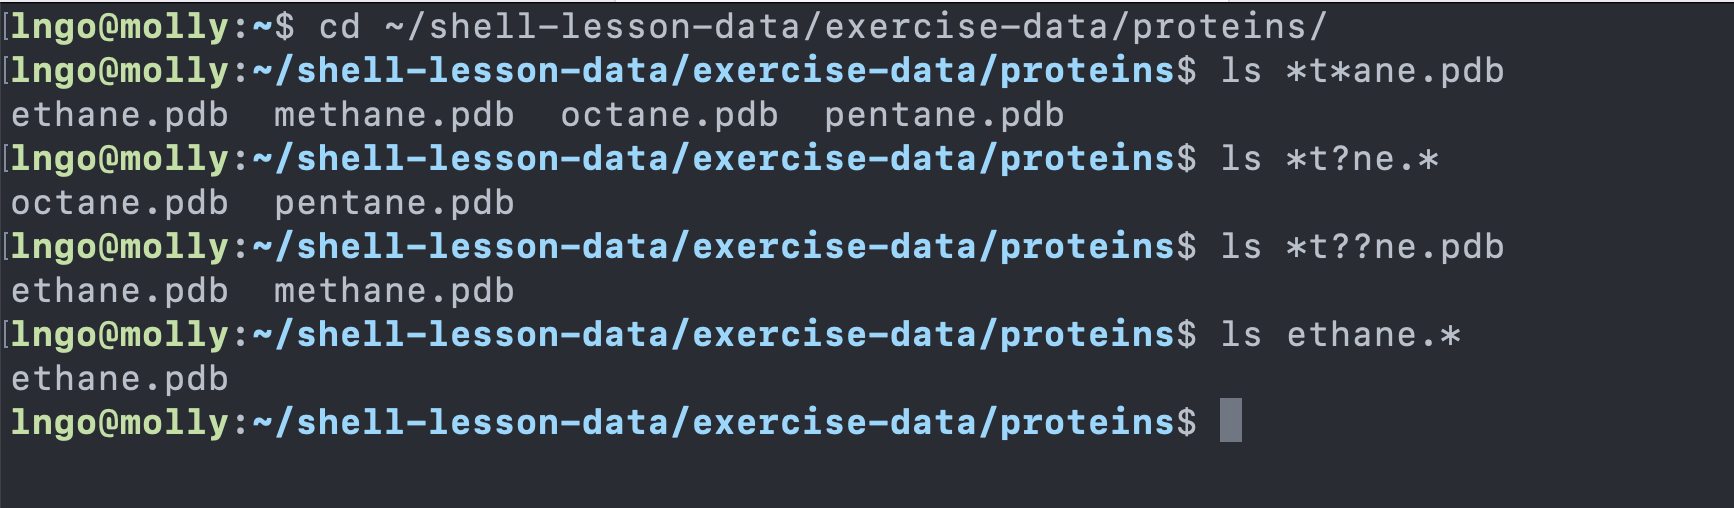
Change into
shell-lesson-data/exercise-data/proteinsand try the following commands
$ ls *t*ane.pdb
$ ls *t?ne.*
$ ls *t??ne.pdb
$ ls ethane.*
Challenge: more on wildcards
Sam has a directory containing calibration data, datasets, and descriptions of the datasets:
.
├── 2015-10-23-calibration.txt
├── 2015-10-23-dataset1.txt
├── 2015-10-23-dataset2.txt
├── 2015-10-23-dataset_overview.txt
├── 2015-10-26-calibration.txt
├── 2015-10-26-dataset1.txt
├── 2015-10-26-dataset2.txt
├── 2015-10-26-dataset_overview.txt
├── 2015-11-23-calibration.txt
├── 2015-11-23-dataset1.txt
├── 2015-11-23-dataset2.txt
├── 2015-11-23-dataset_overview.txt
├── backup
│   ├── calibration
│   └── datasets
└── send_to_bob
    ├── all_datasets_created_on_a_23rd
    └── all_november_files
Before heading off to another field trip, Sam wants to back up her data and send datasets created the 23rd of any month to Bob. Sam uses the following commands to get the job done:
$ cp *dataset* backup/datasets
$ cp ____calibration____ backup/calibration
$ cp 2015-____-____ send_to_bob/all_november_files/
$ cp ____ send_to_bob/all_datasets_created_on_a_23rd/
Help Sam by filling in the blanks.
The resulting directory structure should look like this
.
├── 2015-10-23-calibration.txt
├── 2015-10-23-dataset1.txt
├── 2015-10-23-dataset2.txt
├── 2015-10-23-dataset_overview.txt
├── 2015-10-26-calibration.txt
├── 2015-10-26-dataset1.txt
├── 2015-10-26-dataset2.txt
├── 2015-10-26-dataset_overview.txt
├── 2015-11-23-calibration.txt
├── 2015-11-23-dataset1.txt
├── 2015-11-23-dataset2.txt
├── 2015-11-23-dataset_overview.txt
├── backup
│   ├── calibration
│   │   ├── 2015-10-23-calibration.txt
│   │   ├── 2015-10-26-calibration.txt
│   │   └── 2015-11-23-calibration.txt
│   └── datasets
│       ├── 2015-10-23-dataset1.txt
│       ├── 2015-10-23-dataset2.txt
│       ├── 2015-10-23-dataset_overview.txt
│       ├── 2015-10-26-dataset1.txt
│       ├── 2015-10-26-dataset2.txt
│       ├── 2015-10-26-dataset_overview.txt
│       ├── 2015-11-23-dataset1.txt
│       ├── 2015-11-23-dataset2.txt
│       └── 2015-11-23-dataset_overview.txt
└── send_to_bob
    ├── all_datasets_created_on_a_23rd
    │   ├── 2015-10-23-dataset1.txt
    │   ├── 2015-10-23-dataset2.txt
    │   ├── 2015-10-23-dataset_overview.txt
    │   ├── 2015-11-23-dataset1.txt
    │   ├── 2015-11-23-dataset2.txt
    │   └── 2015-11-23-dataset_overview.txt
    └── all_november_files
        ├── 2015-11-23-calibration.txt
        ├── 2015-11-23-dataset1.txt
        ├── 2015-11-23-dataset2.txt
        └── 2015-11-23-dataset_overview.txt
Solution
$ cp *calibration.txt backup/calibration
$ cp 2015-11-* send_to_bob/all_november_files/
$ cp *-23-dataset* send_to_bob/all_datasets_created_on_a_23rd/